目录
- 提示:本次项目运行连接了服务器
- 第一步:从github下载代码到本地
- 第二步:配置环境
- 提示,最好先将environment.yml关于安装pytorch的命令注释掉,自己安装和服务器相对应的pytorch版本,会省掉很多麻烦,python也是。
- 错误1:可以看出来`cd /tmp/meshed-memory-transformer`这条命令运行出错了。
- 错误1解决方法:
- 接着继续在终端输入`conda env create -f environment.yml`这个命令。这个时候命令开始成功运行,这个过程比较慢,不要着急。
- 接着使用`conda activate m2release`这条命令激活虚拟环境
- 接着在终端执行以下命令安装spacy:`python -m spacy download en`
- 第三步:数据准备
- 第四步:运行train.py文件(我是直接进到我的文件中执行命令的)
- 错误1:No module named 'torch'
- 错误1解决方法:
- 错误2:expected str, bytes or os.PathLike object, not NoneType
- 错误2无用的解决方法
- 错误2真正的解决办法,在运行命令那赋值,github官方给出的命令是:
- 错误3:FileNotFoundError: [Errno 2] No such file or directory: '/annotations/coco_train_ids.npy'
- 错误3解决方法
- 又出错了,因为我个人租的这个服务器没有GPU,而用的是CPU这种情况(第一次租阿里云这边的不太明白,这个只能另做它用了),暂时换回之前用的AutoDL的服务器,那个有GPU。
- 继续给定参数运行train.py文件。错误1:OSError: Unable to open file (unable to open file: name = '/path/to/features', errno = 2, error message = 'No such file or directory', flags = 0, o_flag
- 错误1解决方法:运行train.py那里,没有给features_path给定正确的参数。features_path的参数是`--features_path features/coco_detections.hdf5`。
- 错误2:RuntimeError: cublas runtime error : the GPU program failed to execute at /pytorch/aten/src/THC/THCBlas.cu:450
- 错误2解决方法:
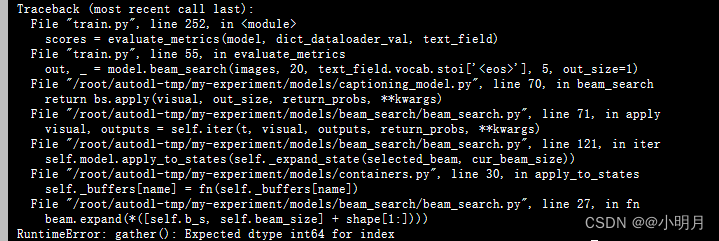
- 错误3:跑到evalution时出错:gather(): Expected dtype int64 for index
- 错误3解决方式:
- 在beam_search.py文件中还有很多gather(),因此在这里一起进行更改:
- 新建文件夹saved_models
- train.py运行成功,但是后面我训练满屏飘警告,不影响运行但影响心情,因此找到报警告的位置进行处理,可算舒服了。
- 如果想要自己训练轮次不小心中断但能接着开始的话,使用--resume_last(从中断的那个轮次接着开始)或者--resume_best(从之前训练的最好的那一轮开始)
- 如果想要的到论文中的评估结果:
论文代码:代码地址
参考的博客:前面环境部分参考这位博主
提示:本次项目运行连接了服务器
第一步:从github下载代码到本地
这次因为我下载了git工具,所以我是复制了github上的代码链接,然后克隆到本地的:


当然也可以直接下载压缩包,也没什么问题,这种克隆的方式免去了下载解压缩过程,会比较快。
第二步:配置环境
提示,最好先将environment.yml关于安装pytorch的命令注释掉,自己安装和服务器相对应的pytorch版本,会省掉很多麻烦,python也是。
在本地打开文件,打开文件后应该会自动弹出来一个提示:就是问你是否要根据environment.yml来创建一个conda环境,由于我手快,直接点了X号,如果你是用服务器,就可以点击X号,如果不是,可以尝试一下。
(1)根据官方代码的说明,首先使用conda env create -f environment.yml命令根据项目中提供的environment.yml文件创建一个名为m2release的Conda环境。
因为我的连接了阿里云服务器,我就不能用之前那种创建虚拟环境的方法了,步骤是:
- 找到terminal(终端),确保这个终端是已连接的远程服务器的终端,我直接输入conda命令,发现人家说找不到conda,那是因为我的远程环境什么东西都没有,看下面第二张图,所以首先得下载Anaconda。


- 下载适合Linux版本的Anaconda。
参考博客:博客 - 下载成功后首先进入environment.yml所在的文件夹:①找到映射的远程文件夹,鼠标右键单击,点击Copy Absolute Path(复制路径);②终端下输入cd 复制的路径,比如的我的是
cd /tmp/meshed-memory-transformer,然后回车,就进入到文件里面了,这样就可以找到environment.yml文件了。

错误1:可以看出来cd /tmp/meshed-memory-transformer这条命令运行出错了。


错误1解决方法:
参考博客
将environment.yml中31行的- openssl=1.1.1=h7b6447c_0改为(加了个g):
- openssl=1.1.1g=h7b6447c_0将environment.yml中17行注释掉:
# - intel-openmp=2019.5=281然后第三个错误,我网上找不到其他方式,我打算去掉版本限制,将- mkl=2019.5=281改为:
- mkl接着继续在终端输入conda env create -f environment.yml这个命令。这个时候命令开始成功运行,这个过程比较慢,不要着急。

创建好虚拟环境,并且下载好其中的库后,在右边Remote Host这里的文件夹envs下是能找到m2release的。

接着使用conda activate m2release这条命令激活虚拟环境

激活之后可以看到命令行前面就不熟Base了,而是m2release。

接着在终端执行以下命令安装spacy:python -m spacy download en

下载成功!
第三步:数据准备

首先,去官方github的说明中下载annotations.zip,解压完成后放到本地目录下面。如果此时远程还没有同步,点击一下刷新就好了。

接着,需要准备特征文件,也就是提到的coco_detections.hdf5,在官方代码中有链接,下载就行。下载成功后,把它放在项目下面,我新建了一个features文件,用来放置coco_detections.hdf5。(下载真的慢的要死)
下载链接


第四步:运行train.py文件(我是直接进到我的文件中执行命令的)

错误1:No module named ‘torch’

错误1解决方法:
我忽略了一点,我要用m2release这个虚拟环境的话,需要在终端(terminal)进入服务器映射文件,激活m2release,然后再用python train.py执行train.py才行,不然我的虚拟环境下载的库就没有作用。根据下图操作,就不会再报没有pytorch的错误了。

错误2:expected str, bytes or os.PathLike object, not NoneType
错误出现原因:在train.by文件的第161行,调用了ImageDetectionsField类的构造函数,传入了一个detections_path参数,但是该参数值为NoneType,而不是预期的字符串类型。

错误2无用的解决方法
- 通过查看train.py的代码,发现在train.py文件中detections_path这个参数在161行是第一次出现。然后定位到data/field.py文件中,对相关代码进行解读,发现detections_path(指示检测结果的路径)赋予的值是None,当然我们也可以采取打印detections_path的方式排查它是否为None。所以我们需要把这个默认值None改掉,给detections_path赋值一个路径。

class ImageDetectionsField(RawField):def __init__(self, preprocessing=None, postprocessing=None, detections_path=None, max_detections=100, sort_by_prob=False, load_in_tmp=True): # detections_path:用于指明检测结果的存储路径 # sort_by_prob:用于指示是否按照概率进行排序 # load_in_tmp:用于指示是否在临时目录中加载数据 self.max_detections = max_detections self.detections_path = detections_path self.sort_by_prob = sort_by_prob tmp_detections_path = os.path.join('/tmp', os.path.basename(detections_path)) # tmp_detections_path:用于指明一个临时的检测结果路径,用os.path.join函数将多个路径组合成同一个路径。 # 创造临时路径是为了确保在处理数据时不会直接修改原始的detections_path路径,而是将结果存储在临时路径中,以避免对原始数据造成影响。 if load_in_tmp: # 如果在临时目录中加载路径 if not os.path.isfile(tmp_detections_path): # 如果tmp_detections_path指向的不是一个文件 if shutil.disk_usage("/tmp")[-1] < os.path.getsize(detections_path): # 使用shutil.disk_usage函数来获取/tmp目录的磁盘使用情况 warnings.warn('Loading from %s, because /tmp has no enough space.' % detections_path) else: warnings.warn("Copying detection file to /tmp") shutil.copyfile(detections_path, tmp_detections_path)() warnings.warn("Done.") self.detections_path = tmp_detections_path # 如果临时路径不是一个文件,则会检查/tmp目录的剩余空间是否足够存储detections_path文件,不过不够,输出警告信息, # 如果够,则将detections_path文件复制到tmp_detections_path,并更新self.detections_path。 else: # 如果tmp_detections_path指向的是一个文件 self.detections_path = tmp_detections_path # 这里要判断tmp_detections_path是不是一个文件的逻辑在于:tmp_detections_path指向一个有效的文件,而不是目录或其他类型的路径。- 在field.py中给detections_path赋予具体路径,我在服务器映射文件下新建了一个文件夹,用来存储检测结果。然后复制它的绝对路径,赋值给detections_path。


3.但是这样还是不能解决这个问题,我的路径好像赋值不够准确(sorry)再进行查看,发现train.py的161行对detections_path用args.features_path进行了赋值,所以要继续查看这个args.features_path,我尝试打印args.features_path的值,果然打印出来是None。

错误2真正的解决办法,在运行命令那赋值,github官方给出的命令是:
python train.py --exp_name m2_transformer --batch_size 50 --m 40 --head 8 --warmup 10000 --features_path /path/to/features --annotation_folder /path/to/annotations
错误3:FileNotFoundError: [Errno 2] No such file or directory: ‘/annotations/coco_train_ids.npy’
错误原因:–annotation_folder这个参数后面的文件夹路径不对

错误3解决方法
--annotation_folder后面的/path/to/annotations改为annotations,也就是正确的运行命令是:
python train.py --exp_name m2_transformer --batch_size 50 --m 40 --head 8 --warmup 10000 --features_path /path/to/features --annotation_folder annotations又出错了,因为我个人租的这个服务器没有GPU,而用的是CPU这种情况(第一次租阿里云这边的不太明白,这个只能另做它用了),暂时换回之前用的AutoDL的服务器,那个有GPU。
继续给定参数运行train.py文件。错误1:OSError: Unable to open file (unable to open file: name = ‘/path/to/features’, errno = 2, error message = ‘No such file or directory’, flags = 0, o_flag
意思是找不到path/to/features这个路径
错误1解决方法:运行train.py那里,没有给features_path给定正确的参数。features_path的参数是--features_path features/coco_detections.hdf5。
所以运行train.py的命令是:
python train.py --exp_name m2_transformer --batch_size 50 --m 40 --head 8 --warmup 10000 --features_path features/coco_detections.hdf5 --annotation_folder annotations错误2:RuntimeError: cublas runtime error : the GPU program failed to execute at /pytorch/aten/src/THC/THCBlas.cu:450

错误2解决方法:
首先查看了我这个服务器的cuda支持的最高版本

接着查看我虚拟环境中的pytorch的版本:

所以应该是我的pytorch的版本太低了,与cuda不兼容。因此重新去下载pytorch试试看。

升级pytorch之后又说tensorboard的版本太低了

先卸载掉旧版本的tensorboard:pip uninstall tensorboard
再重新下载tensorboard,我这里下载需要加上版本号:
pip install tensorboard==2.6.0
错误3:跑到evalution时出错:gather(): Expected dtype int64 for index
错误原因是:gather()函数期待的索引值是个int。而beam.expand(*([self.b_s, self.beam_size] + shape[1:]))返回的索引不是一个整数(beam_search.py文件中)。
错误3解决方式:
beam.expand(*([self.b_s, self.beam_size] + shape[1:]))返回的索引转换为整数类型。
s = torch.gather(s.view(*([self.b_s, cur_beam_size] + shape[1:])), 1, beam.expand(*([self.b_s, self.beam_size] + shape[1:])).long())在beam_search.py文件中还有很多gather(),因此在这里一起进行更改:


新建文件夹saved_models

train.py运行成功,但是后面我训练满屏飘警告,不影响运行但影响心情,因此找到报警告的位置进行处理,可算舒服了。


如果想要自己训练轮次不小心中断但能接着开始的话,使用–resume_last(从中断的那个轮次接着开始)或者–resume_best(从之前训练的最好的那一轮开始)
比如:python train.py --exp_name m2_transformer --batch_size 50 --m 40 --head 8 --warmup 10000 --features_path features/coco_detections.hdf5 --annotation_folder annotations --resume_last
如果想要的到论文中的评估结果:
下载meshed_memory-transformer.pth,将它放在项目工程下面,可以按照放置的位置更改test.py代码中的data的路径。然后按照以下代码运行:
python test.py --batch_size 10 --workers 10 --features_path features/coco_detections.hdf5 --annotation_folder annotations下图使用作者预训练好的权重文件还原了论文最后的结果:

如果想要按照自己的训练结果去评估,也是把data的路径更改合适,然后按照上面的命令运行即可(我目前只跑了17个epoch,所以效果比较差)。


